
Large-scale virtual reality
In this article, real-time lead Jack Condon uses our recent Adventurer VR project as a case study to examine the ins-and-outs of our process for creating a large-scale virtual reality experience.
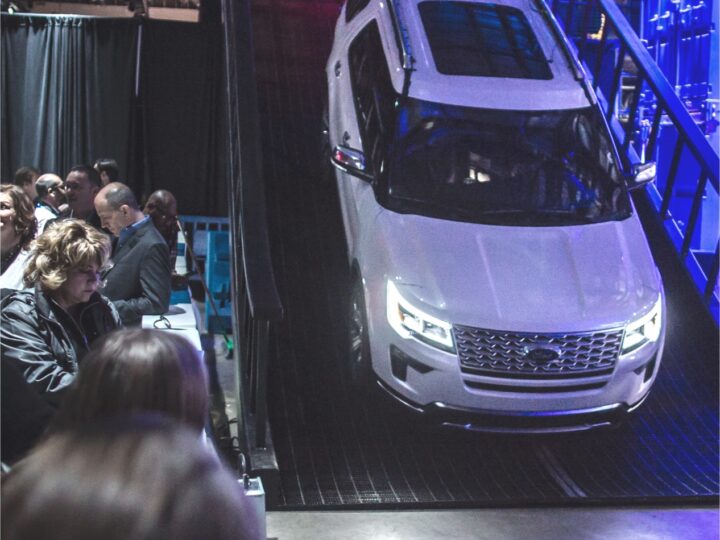
About a year ago, we undertook one of our biggest projects to date. This mixed reality experience brought together SUVs, Unreal Engine and a bespoke 44-camera Optitrack system to track entire cars around a physical circuit as audiences toured famous American landscapes in virtual reality.
While we’ll be looking at the project throughout this blog, my goal with this post isn’t to examine the project itself, but what it took to bring it to life. In particular, I want to shed light on some of the production learnings that we discovered along the way as we worked to achieve such a high-quality, large-scale work in such a small time frame – just 10 weeks in all.
Adventurer VR
Mixed reality merges real + virtual through bespoke real-time tracking.
A quick project rundown
But first, some facts and metrics about the project. This project was a collaboration with an international agency we’ve worked with for a number of years. Because of our long standing relationship, for this project we were working together even before pre-production to sort out questions around creative and art direction. So coming into pre-production we already had some storyboards of the experience, a moodboard, and the beginnings of an art bible. Finally, it’s worth noting again that the entire process was just 10 weeks long, including resourcing, scaling, building hardware, planning, development, QA and deployment.
Okay, with the basics out of the way, let’s dig in!

Anatomy of the project
I wanted to start with how a project like this can be separated into its components at its highest level. The anatomy of rapid projects like this isn’t actually so different from a long form job. We still move through pre-production, production, and finally physical deployment. That said, the nuances of these processes become vastly different – and that’s the core of what I’ll be covering here. But, before we get started, let me provide a quick definition of each phase:
- Preproduction: A skeleton team creates the documentation needed to eventually enable a much larger production team to work efficiently.
- Production: A full team made up of dynamic skill sets (software engineers, embedded systems engineers, artists, designers, lighting experts, networking specialists, robotics specialists etc.) develop each aspect of the experience, culminating in a portable package or plan that can be executed on site during deployment.
- Deployment: A skeleton team travels (in this case, overseas) to execute the experience on site. Often, this is the first time all the systems can be tested in their final form, so this team is typically made up of a skilled yet diverse team capable of handling problems on all aspects of the project.
For this job in particular, we had an external timeline that we were working within, so we knew from the beginning that we would have just 2 weeks for deployment. This meant that we would need to build all our systems to be dynamic on site to ensure we could pivot – but more on that later!
Pre-production in a fast turn around
In my experience there’s a strange magic ratio when you work on projects like this when it comes to working out how long you’re going to stay in pre-production. Essentially, if you cut too much from pre-production, when you scale up to a larger production team that team won’t have the autonomy to work effectively, stripping you of precious production time. My hard and fast rule is to stay in pre-production as long as possible, even if this means pushing production to the very limits. The logic for this is simple: working hard on something you know is valuable is more rewarding than working hard on something that could change at any minute.
It comes down to stress at the end of the day, and in my view the stress of not being organised outweighs the stress of a more limited production time in most cases. For this project, we decided to allow for a two week pre-production period with a team of 4 people. That may not seem like a lot, but in reality that’s 25% of our total production time. Ouch!
With this kind of tight pre-production turnaround, you know from the outset that you’ll be limited in the quality of your documentation. That means that you need to strip it down to the bare minimum, and make up for it in documentation with constant and clear communication throughout production.
This was our MVP for pre-production:
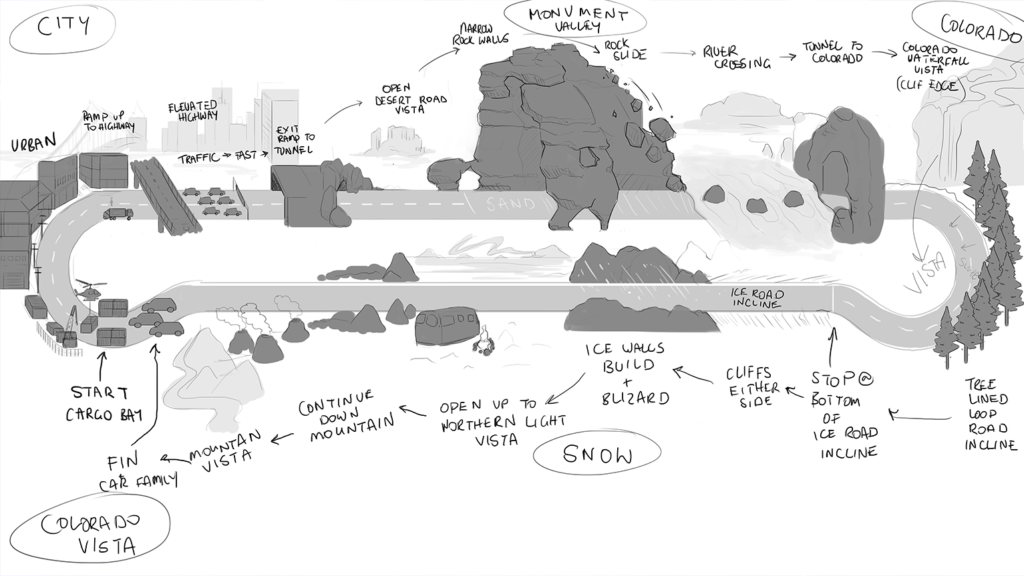
- User journey and experience mapping: For us, this looked like a story board provided by the creative director, with accompanying photo-bashed imagery, as well as a sketch of the track explaining where each segment of the experience would take place.
- Technical blockout of the track: This was incredibly important as a guide for building levels that would actually sync to the physical track.
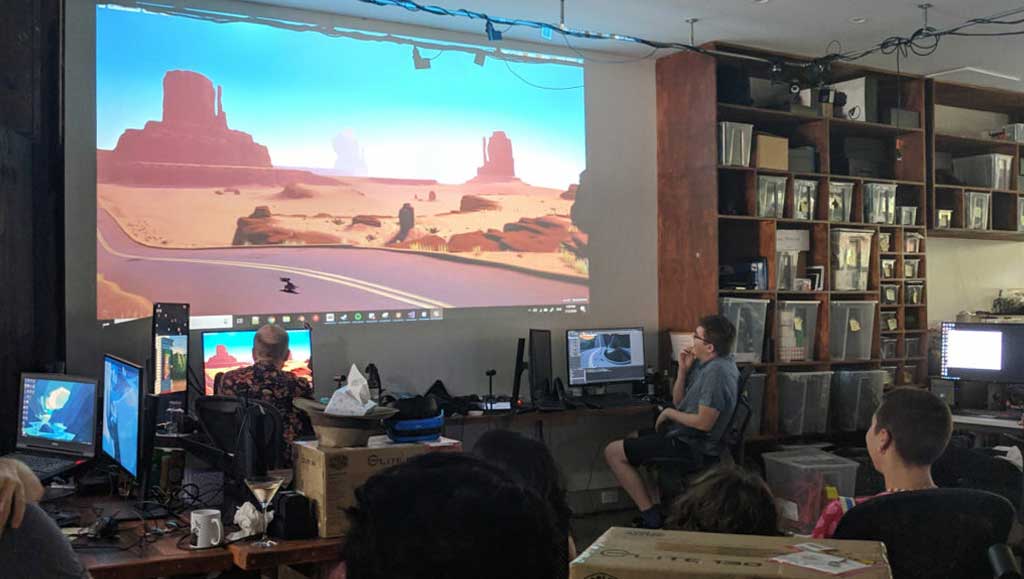
- Visual vertical slice: An example finished environment including one of each asset type (rock, tree, fog etc.) with documentation on the toolchain and processes needed to achieve a similar effect.
- Art bible: A document defining the visual direction of the work, with real-world reference images and moodboards to guide production.
Onboarding a team
By the time we got to production, we had a total of 18 people (5 internal staff and 10 contractors). Scaling like this is no easy thing to do when you can only provide two week pre-production. In my experience with newly scaled-up teams, it’s optimistic to think that just because you’ve made a gigantic PDF or Wiki that people will retain all the necessary information. It’s up to the project’s lead to get this content across in an exciting way that doesn’t stop at the first briefing. You need to constantly, and collectively, go through material in an interactive way.
For us, the fundamental step here was to remove the normal review process and replace it with constant and fun education. We approached this by staging interactive lectures with a large projector twice a week, focusing on various aspects of the project. During these lectures we would collectively create rules for the project, from both a creative and technical perspective. We’d also have weekly project retros every Friday over a beer to look for exceptions to the rules we were creating. This was a great way to keep all the artists synched across the project, and an opportunity for each member of the team to learn how to spot and raise mistakes in the project structure.
THE LEARNING:
We found that adopting a more interactive review process was invaluable in building the team’s autonomy. When you’re all learning and growing together, small teams can run in parallel without fear of clashes in art direction and implementation. And, because these smaller teams have creative agency to explore and execute their own ideas, they become more motivated to produce meaningful work. While this approach has the potential to cut a lot of time away from production through constant meetings, it also saves time in reducing the amount of work that’s knocked back (which in our case we had even less time for). And, perhaps more importantly for us, we found that this was a far more human and beautiful way to work.
Build automation + debug tools
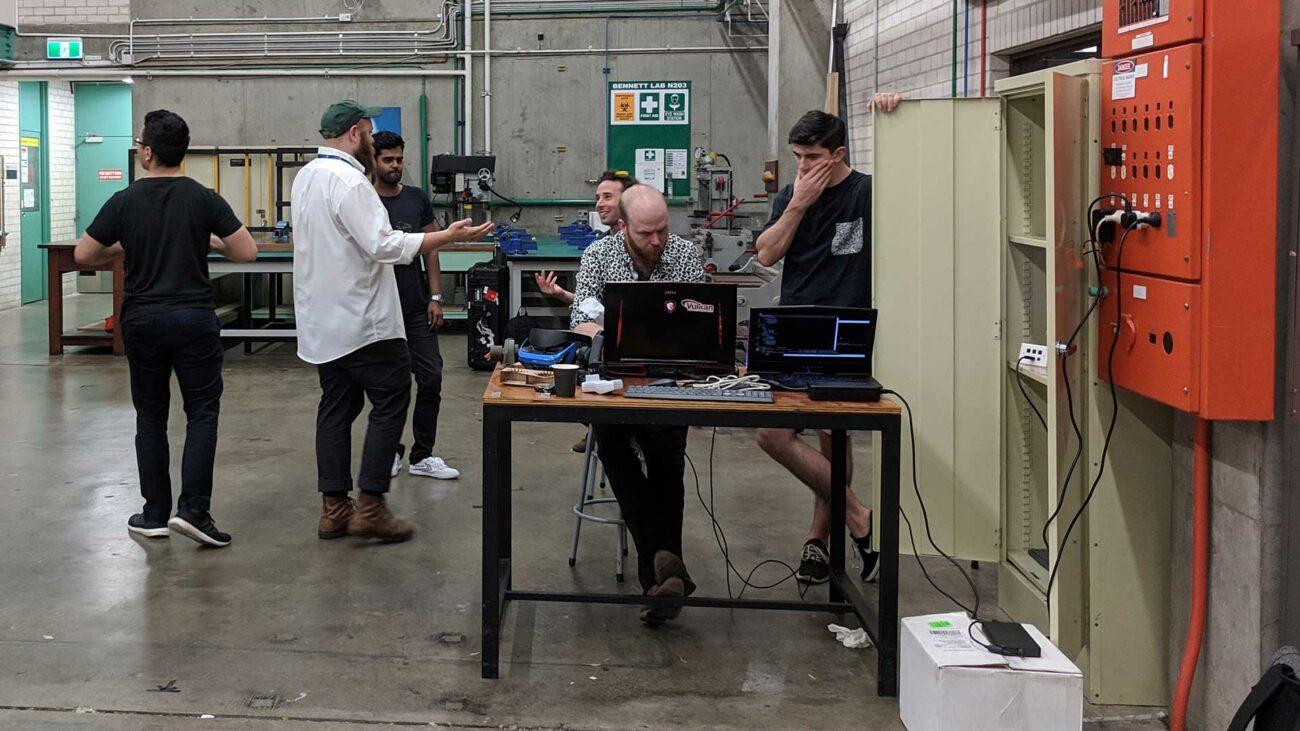
Over the years, I’ve found that autonomy doesn’t just come through team dynamics and processes, but also development tools. For this project, we had a unique tech stack that included a physical circuit and Optitrack solution that we couldn’t access until we were on site. We needed ways for our large team to test continuous builds in a set up as close to the real thing as we could get – using whatever we could get our hands on to do so.
One of my favourite solutions for testing these systems in the office was a tissue box covered with markers to simulate the car at a 1/500 scale. However, while the tissue box was a fantastic gimmick and provided a range of initial technical learnings, it was impractical for the entire team to test with a single, sacred tissue box.
The next solution was to work with researchers at the University of Sydney, where they had a huge Optitrack rig to test drones in one of their aeronautics labs. Here we were able to test the track at ¼ scale inside an actual moving vehicle – in this case with a laptop strapped to a shopping trolley. This allowed us to actually FEEL what it would be like in our final tracking rig. It also let us record the motion in Sequencer and use this to simulate the movement later for the wider team. While we ended up having to polish these sequences a lot during development, and add a host of cheat codes to move through the experience, this kind of testing rig was invaluable in speeding up development.
As we moved through production, we also realised that we needed a methodology for robust build automation and deployment. We did this with the help of open source software Jenkins (set up by in-house expert Nic Ferrar following this tutorial) which triggered an XCOPY script pushing the latest build onto 3 laptops in a car-like configuration so we could test in a multiplayer environment throughout production. This was huge because it allowed artists to test their content from all viewing angles, and let us know when we had issues with builds as opposed to development testing.
THE LEARNING:
While creating these kinds of tools does take up development time, if your team is bigger than 3 or 4 people it’s almost always worth investing into these pipelines. Ultimately, these processes reduce stress throughout the team, giving people the ability to work on the things they’re excited about rather than focusing on the boring stuff. No project is too small to develop better development environments – the changes will bring you happiness every day!
Deploying on the fly
Deployment for jobs of this scale is never easy, and you need to be able to think on the fly. Take the track for this project. Putting together the physical build took a crew of 15 people moving around giant metal platforms. Where those platforms landed was of huge importance, as they had to line up with what we’d predicted in the virtual world. It quickly became clear that we needed a system to line up the physical world being built on site, and the virtual world we’d been building back in Australia.
After about half an hour of hacking, we had an Optitrack marker attached to a tablet that could feed back into our virtual map in Unreal Engine. Certainly not a robust solution, but it did allow us to see what was happening virtually and communicate that to the physical set builders. And once they could see the problems and understand where each piece of the track needed to go, they were able to use their skills to bring that vision to life.
THE LEARNING:
Ultimately what we learned through this deployment experience is that you never know what’s going to go wrong on set. And to get through whatever comes at you, you need a talented team with the ability to solve problems on the fly. You also need tools – or the ability to make tools – that will help you communicate and collaborate with people who may not have worked with these kinds of new technologies before.
Team autonomy throughout deployment
Encouraging team autonomy extended into deployment as well. A prime example was the professional drivers from Ford. They found the job pretty amusing, claiming that it was “the slowest lap” they’d ever been asked to do. But in order for them to do their job, it was important that they were able to understand what was happening in the virtual world. While we were tempted to try putting them in VR, we ended up developing a small app that could keep them in synch.

In the process of making this app, we asked the drivers what they thought might help, and they ended up suggesting a whole host of features that would help them better align the experience and the environment. With their input, we were able to create a tool that saw each driver become an integral part of the social experience of the project – even though they couldn’t see what was happening in VR, the app would let them know. This resulted in many benefits; for example they had the idea to switch the air con on as we went into the ice mountains of Colorado, or the heater for the deserts of Monument Valley creating a much more immersive experience and it ended up being mentioned in a news report!
THE LEARNING:
Development never really stops on these kinds of projects. Whilst feature lock is important, you also need to be brave enough to continue adapting to your surroundings. In truth, finding this balance is not something that can be taught and something we are still getting better and better at. Working with external teams might mean you need to find creative ways to share your vision, but I’ve always found that effort has been repaid through the new ideas that working with people outside of your field brings.

Wrapping up
Executing a project of this size was bound to reveal many production learnings. While there were a lot of things we did wrong, I’m hoping that sharing some of what we did right might one day help you build a 100 metre indoor mixed reality racetrack halfway across the globe.
At the end of the day, I’d say that our biggest learning was that, even on large projects, it’s worth experimenting with internal processes. There were a lot of things that we tried throughout this project that we weren’t sure would work, but we tried them anyway. Without trying new things you can’t grow as a team – and, as far as I’m concerned, that’s the most important takeaway of all.


